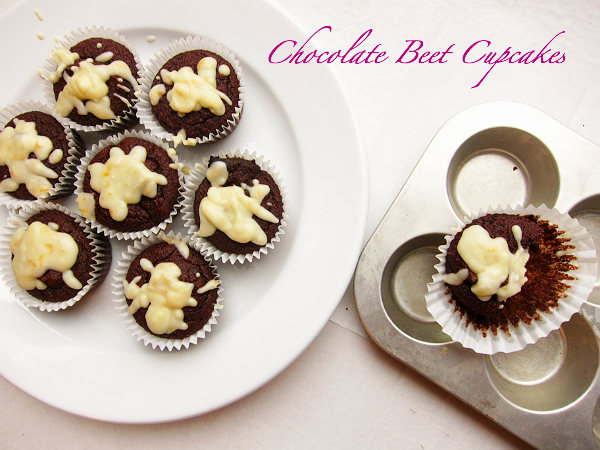
Standing around the large table in Home Economics, we all listened to Mrs. Haile speak on the glories of cake. She told us how one cake recipe had a secret ingredient in it we wouldn’t likely see in a recipe. Leaving us all guessing what could possibly it? When it came time to form groups,Continue reading “Chocolate Beet Cupcakes (Grain-free)”
Tag Archives: chocolate
Grain-free Chocolate Cupcakes with Chocolate Ganache
Although it is Ash Wednesday by the time most of you will read this (which I apologize for posting a chocolate cupcake recipe); but, I remade these little wonders from an earlier recipe I have here and wanted to update it. What I found was this original post was my reflections on Lent three yearsContinue reading “Grain-free Chocolate Cupcakes with Chocolate Ganache”
Paleo Zucchini Brownies
Brownies are one of my favorites, because truly, what is there not to like about a cake-like bar that is not a cake and can be cooked in one pan. I commonly ask people if given the option between the following: chocolate chip cookie, cake or brownie, what would you choose to have once aContinue reading “Paleo Zucchini Brownies”
Tasty Gluten-free Chocolate Chip Cookies

I was in the children section at a bookstore with my friend Tina. We were recalling some of our favorite childhood books. I pulled out Cloudy with a Chance of Meatballs with nostalgic fondness. I remember thinking how amazing it would be if meatballs fell from the sky, and as a child I daydreamed about it. Then, there was Stone Soup, another favorite with ingredients like carrots, beef, potatoes & barley. I never had barley at that time, but it sounded wonderful. As I continued to pull out books there was a common theme Tina pointed out…FOOD. She said, “Kamille, you’ve always been a foodie.”
Never gave it much thought, but I guess she’s right. I still have my first cookbook from age 7, Mickey Mouse Cookbook with little notes inside. One of my favorite treats is checking out cookbooks from the library. When Tayers was born, I seriously had at least 10 cookbooks from the library (you know to read while nursing, etc). And what is it with the fascination with Food magazines. How many recipes does one truly need for Chocolate Cake, brownies, or apple pie? And if you look through my recipes you’ll see that I have three different chocolate chip cookie recipes available. So you might wonder why I’m offering you another one. Well, I haven’t done much baking lately and I’ve been trying to eliminate wheat flour from our diet; however, I wanted to make a special New Year’s Day treat, which could be made fairly quickly. I adapted my Superlative Chocolate Chip Cookie recipe with this one to make it a paleofied version. As Ben said after eating one, “these are good and not just Paleo good,” meaning they don’t taste like they’re a second rate version.

A Year Ago: Quicky Sticky Biscuits
Gluten-Free Chocolate Chip Cookies (printable recipe)
I love my Superlative Chocolate Chip Cookies and these ones are even more moist, and possibly better. This is the first time I have used coconut sugar. It didn’t make the cookies taste like coconut either.
Ingredients:
3 1/3 cups (8 3/4 ounces) almond flour
1 tsp baking soda
10 Tb unsalted butter
1 cup coconut sugar
1 tsp Celtic sea salt
2 tsp pure vanilla extract
1 egg
1 egg yolk
4 ounces Valhrona chocolate (82% cacao), chopped into small pieces
1/2 cup chopped pecans
Vanilla sea salt, or flaked sea salt
Directions: Preheat oven to 350. Line baking sheet with parchment paper & set aside. Measure almond flour & baking soda in a medium bowl and set aside.
On medium heat, melt 8 Tb of butter in a pan, constantly swirling until the butter is browned and smells like yummy toasted nuts (about 3 -4 minutes). Pour the melted butter into a metal bowl, while trying to leave the bits in the pan. Add the remainder 2 Tb of butter to melted butter and stir till it’s all melted. Add the sugar, vanilla & salt and thoroughly combine. Add the egg & egg yolk and mix for 30 seconds then allow it to rest for 1 minute. Continue to mix for 30 seconds again, then rest for 1 minute and repeat one more time.
Add the almond flour & baking soda to the wet mixture and stir to combine. Add in the chopped chocolate & pecans and mix throughout. Place 2 Tb of dough onto the parchment paper, spaced 2 inches apart. Sprinkle vanilla salt or flaked sea salt on top of dough. Bake for 12 minutes. Let cool completely on pan and then remove.
Fast Fudge Cake

This morning I woke up to body aching everywhere, but don’t feel too bad on my account, because it’s due to starting a new exercise routine–not the stomach bug. Ben has been going to this little gym in town for about 4-5 months, along with my friend Jordan (who is the official unofficial recruiting agent) who encouraged him to join. As I’ve been dealing with anxiety, irritable stomach issues and most likely burnout–I felt like it was as good of a time as any to join the gym. But why so sore you ask? Well, this little gym packs quite the punch. It’s not your typical gym of doing the routinized circuit or swiping your card and heading towards the elliptical machine. It’s an all over cardio workout that relies heavily on weight-bearing activities.
Before you join you attend what they call Basecamp. It is either broken into two days or one day of 2 1/2 hours, where one of the gym’s coaches teaches you all the exercises/workouts, ensuring you learn technique. The first thing I did was jumping rope. And I thought, “jumping rope–seriously, that’s a snap.” 100 jumped ropes. What I failed to realize is that I haven’t jumped rope since I was about 10. I hit about 65 and went mental. Then, from 65 to 80, I believe I did a culmination of either hitting my own head with the rope, getting tangled in my foot, etc. Suffice to say, I was humbled. The coach said, “you’re thinking about it too much.” True! Well, that was just the beginning and we went on to doing multiple variations of squats, lifts, push-ups, pull-ups, & weight-bearing. So every single ounce of my body got worked.
My legs felt like jelly and mind you we have two flights of stairs, so walking down them feels like I’m an 85-year-old woman. It’s good though. I know it’s going to be hard, but I tell myself a couple of things to prepare myself.
1. It’s a break from being mom.
2. This too shall pass.
3. I went through labor twice without meds, so no workout could be harder than that.
4. I want something better for my life in terms of mental, emotional & physical stamina, which I want my girls to have, so I know taking time for myself in this area is critical.
I haven’t been baking lately. In part, it’s due to not having much of a sweet tooth; but, mainly I haven’t had much time or creativity lurking. This is something I made a while back, but I still remember the moistness of the cake. It’s a easy to make and honestly, if you’re pressed for time–you could add the wet ingredients in one bowl and then add the dry ingredients in with it (making it a one-bowl cake). I hope you are finding and making time for yourself.


Fast Fudge Cake (printable recipe)
This recipe is adapted from Fine Cooking magazine. I had a little ganache already made up in my fridge, so my cake had a thin glaze a top. Regardless, it turned out wonderfully and if you want to serve with just whipped cream, powdered sugar and fresh berries–it would suit it well.
Ingredients:
4 1/2 oz (1 cup) unbleached all-purpose flour
1 oz. (1/4 cup plus 2 Tb) unsweetened natural cocoa powder
1/2 tsp baking soda
1/2 tsp kosher salt
1/4 lb (1/2 cup) unsalted butter, melted and warm
1 1/4 cups packed light brown sugar
2 large eggs, room temperature
1 tsp pure vanilla extract
1/2 cup hot water
Ganache:
1/2 lb bittersweet chocolate or semisweet, chopped up
1 cup heavy cream
Directions: Preheat oven to 350. Grease & flour or grease & line with parchment either an 8×2- or 9×2-inch round cake pan. Set aside.
In a small bowl, whisk together the flour, cocoa powder, baking soda & salt. Sift only if the cocoa continues having lumps after whisking.
In a large bowl, combine the melted butter and brown sugar with a wooden spoon or spatula. Add the eggs & vanilla, stirring till combined well. Add the dry ingredients, just till moistened. Pour the hot water over the batter and stir just until it’s completely incorporated.
Scrape the batter into the prepared pan. For an 8×2-inch pan, bake 35 to 40 minutes or till a toothpick inserted comes out clean. For a 9×2-inch pan, bake for about 30 minutes, or till a toothpick inserted comes out clean. Cool on a wire rack for 10 minutes, then run a thin knife along the edge and invert the pan onto a plate. Invert it again back onto the rack to cool completely.
Making the Ganache: Chop up your chocolate into bite sized pieces and put into a heat proof bowl and set aside. Heat up the cream over medium heat. Once it starts to boil, remove from the heat and pour over the chocolate in the bowl. Allow the cream & chocolate to sit for about 45 seconds. Whisk the chocolate & cream together until the cream is completely incorporated and the ganache is smooth & a just slightly thick.
Putting the Cake together: Once the cake is cool, put foil under the wire rack to catch any drippings from the ganache. Pour the ganache over the cake allowing it to go down the sides. You can also allow the cake cool completely cool in the pan and make half of the ganache and pour it on top while in the pan. Let the cake with ganache set for about an hour.
Chocolate Truffle Cupcakes

If you’re a chocolate lover then proceed. If you’re not, well I’m sorry, but maybe you will be a chocolate liker after trying these. I made well over 200 of these Chocolate Truffle Cupcakes for my friend’s wedding (Jason & Tina) while I was 7 months pregnant. I realized two things after that baking extravaganza of ’08. One is no matter how much I love someone, never again will I say yes to baking all the desserts for a large party while that pregnant and carrying for a 20 month old. Two, is how easy these are to make–no one will know otherwise.
I think I can get these out in 40 minutes, which is pretty excellent for a sophisticated dessert. They are also very adaptable with your chocolate liking. You could use all bittersweet (typically 60%), semisweet, or milk chocolate. You can mix different varieties as well. You can make them gluten-free. You can make them in big muffin tins or miniature ones. If you want to add a bit of espresso to bring out the chocolate flavor even more–then do it. I love these for all those reasons. And I can’t understand why I haven’t shared them until now.
Before we go onto the recipe, I should share a bit about my gluten-intolerant friend Tina who these were intended for and I’ve written about before. We met through one of her ex-boyfriends and I knew we were kindred spirits. She has a quiet reserve about her (at least when compared to her husband), but she is full of life with joy emanating from her. Although she seems to fill administrative jobs, which she’s wonderfully gifted at, her heart is passionate for women fulfilling their God given talents & calling. We have spent many hours talking about our dreams of what we will become when we grow up and I can depend upon her to watch very cheesy movies together. I can always count on her to be supportive, honest & spontaneous with me. So when she found out she was gluten-intolerant, I knew my job was set to bake GF treats for her.

Double Chocolate Truffle Cupcakes (printable recipe)
Recipe is inspired from Martha Stewart. This is also the time to use good quality chocolate, since it is the star ingredient. However, don’t let that stop you if you only have chocolate chips on hand. I’ve used semi-sweet chocolate chips before and they turn out great.
Ingredients:
5 Tb unsalted butter
7 ounces milk chocolate chopped, Belcolade
7 ounces 71% cacao dark bittersweet chopped, Valhrona
1 Tb sugar
1 Tb brown rice flour (or all-purpose flour)
2 eggs
1 tsp salt
Butter & extra flour for muffin tins
Directions: Preheat oven to 325 degrees. Butter & flour a 6 slot large muffin tin & set aside. Set a heat proof bowl over a pot with simmering water. Add the butter & chocolate. Stir to melt and combine. Remove from heat.
Add the eggs & sugar to a food processor & process for 2 minutes until light in color & foamy. Add flour & salt, process to combine (10 seconds). Add about 1/4 cup of melted chocolate to eggs & process till combined. Continue with 1/4 cup until all of the melted chocolate is mixed with the egg mixture.
Evenly distribute chocolate mixture to the prepared muffin tin. Gently pat down tops with the back of silver spoon. Bake for 18 to 20 minutes. Cool on a rack. Loosen with a knife around the edges and serve.
**12 cup regular muffin tin bake for 13-15 minutes.
**24 cup miniature muffin tin bake for 10-12 minutes.
Great topped with sliced strawberries, fresh raspberries, a raspberry puree, or ice cream.
Dave Matthews Band Magic Brownies Cupcakes

I have been reading this cookbook, The Flavor Bible. It’s inspiring for anyone who takes their cooking or baking skills seriously. My copy is on loan from the library, but I would recommend this one to your home library archives. The author made a point how food is not only for sustenance, because if it were, we would eat the same thing 3 times a day, 7 days a week, 52 weeks of the year. Rather, food is about the flavor profiles, which are the taste, mouth feel, aroma & X factor. All of these being great, but I think the X factor stood out the most. It is the stories, the total experience, the nostalgia, which comes to mind after eating a specific food.
We all have these. And quite honestly, it’s what makes certain foods disgusting to some, while to another their “last supper.” It’s no wonder Jesus chose to perform his first miracle at a wedding feast and through the fruit of the vine. He wove the spiritual with the senses, creating this amazing story of his complete love & provision.

So as I was making these souffle chocolate cupcakes yesterday, I didn’t have any idea what they would be like. Nor did I realize that they would stir the X factor up. You see, after my oldest was born and people graciously dropped off meals every night, one night someone dropped off a roasted chicken, salad, and a pint of Ben & Jerry’s Dave Matthews Band Magic Brownies Ice Cream. I personally am a ‘every but the..’ sort of girl. However, the melding of the brownie chunks, vanilla & raspberry swirled made for quite the addiction.
")
Oh so back to these cupcakes. Well, I have been salivating over these for a while. Not only that, but they are gluten-free, which made me think of my friend Tina (she works with Ben & I feel bad when I only bring in gluten treats). However, Tina loves raspberry & chocolate, so I changed it up a bit. Then, when I bit into one, it took me back to our old apartment with my week old baby and a still, quiet moment, that everything would be okay in my insane, postpartum state. I’m not promising that this will create quite the same X factor for you, but maybe you should make some for yourself and some new mother to create one for her.

Dave Matthews Band Magic Brownie Cupcakes
(printable recipe)
This recipe has been adapted from Smitten Kitchen’s Chocolate Souffle Cupcakes, which had a mint topping and used espresso powder instead of the actual espresso I used in mine. You should do as Deb over at Smitten Kitchen says, “eat at once,” because the coolness of the Raspberry Cream enhances the dessert.
Chocolate Soufflé Cupcakes
6 ounces (170 grams) bittersweet or semisweet chocolate, chopped
6 tablespoons (86 grams) unsalted butter, cut into pieces
1 Tb fresh espresso
3 large eggs, separated
6 tablespoons (97 grams) sugar, divided
1/4 teaspoon salt
1 teaspoon vanilla extract
White Chocolate Raspberry Cream
2 ounces (56 grams) white chocolate, finely chopped
3 ounces heavy whipping cream
2/3 cup (76 grams) frozen raspberries + 1 tsp water
Get the white chocolate cream ready for later: Put the white chocolate in a small bowl. Then, bring the cream to a simmer and pour it over the chocolate. Let it sit for a minute to melt the chocolate, then whisk well. Lay a piece of plastic wrap on the surface of the cream. Chill until very cold, about two hours.
Cupcakes: Preheat oven to 350°F. Line 9 standard-size (3-ounce) muffin cups with paper liners. Put the butter, chocolate & espresso in a saucepan. Place over low heat, stirring occasionally until melted. Remove from heat. Cool to lukewarm, stirring occasionally.
Using electric mixer, beat egg yolks and 3 tablespoons sugar in medium bowl until mixture is very thick and pale, about 2 minutes. Briefly beat lukewarm chocolate mixture, then vanilla extract, into yolk mixture. Since I used my one Kitchenaid bowl for the whole process, I poured the chocolate-egg yolk contents into another bowl. Clean the bowl & use the whisk attachment, beat the egg whites, sugar & salt until medium-firm peaks form. Using a spatula, fold whites into chocolate mixture in 3 additions. Divide batter among prepared cups, filling each three-fourths of the way.
Bake cakes until tops are puffed and dry to the touch and a tester inserted into the centers comes out with some moist crumbs attached, about 15 to 20 minutes. Cool in pan on a cooling rack. Once they are cool, add the raspberry cream.
Make Raspberry Puree:Over low heat, add the frozen raspberries and 1 tsp water to a small saucepan. Allow the raspberries to slowly melt down into a mush. This will take about 5-7 minutes. Place a sieve above a small bowl, then dump the raspberry contents into the sieve. Take a spatula and begin to push the raspberries through the sieve (you are getting the puree while the sieve will catch the seeds). You will get about 2 Tbs of puree. Set aside to add to your white chocolate cream.
Putting it altogether: Beat white chocolate cream with electric beaters until medium peaks form. Slowly add the raspberry puree. The cream might curdle a bit, but don’t over beat. If you find that the cream isn’t the right consistency, then put the cream in a pastry bag or plastic sandwich bag and place in fridge for a bit. Cut the end and squeeze out about 1 Tb on top of each cupcake. Eat immediately to gain the full experience of the cold raspberry cream with the delicate crumb of the brownie.
Throw Nabisco Out with Homemade Oreos


There are some people who say they’ve never enjoyed Oreos. I, on the other hand, have always enjoyed them. In fact, in high school I spent pretty much every weekend of my junior year at my surrogate family’s house–the Carrillo’s. Veronica (then Carrillo) is (and has been) one of my dearest of friends since I was four years old. We are complete opposites, share a plethora of memories, and loyalty can always be found in her.
While being the adopted daughter, I would hear the question from Mrs. Carrillo, “Kamille, is there anything you want at the store?” To which she would hear, “I guess some double stuff Oreos?!” And come the next couple times around to making the grocery list, Mrs. Carrillo would instinctively have the double stuff on the list (or have them waiting for me). “But now I’m taking it back, I’m taking it all back.” Those Nabisco kind have nothing on these chocolatey mixed with white chocolate goodness.

And they went rather well with my mom get away weekend. I got away with some of my fellow mom friends, and it was beyond glorious. Being able to spend time to know and be known by these women I dearly love & respect was a glimpse of heaven bound. So, in terms of these cookies, I must say that the first bite of just the cookies left me a bit disappointed. I was expecting a little bit more depth of chocolate richness; but, in that first bite I felt it lacking. However, as the flavors began to meld and the salt kicked in–the chocolate popped, which made me want another bite. And that’s how these cookies work–you can’t just have one.

Homemade Oreos (printable recipe)
This recipe comes from The Essence of Chocolate. If you were wondering if you would go back to Oreos after tasting these, the answer is NO! You will want to make the dough when you’re ready to start rolling it out. Putting it in the fridge will make it too hard to roll and not necessary.
Ingredients
Filling:
- 1/2 cup heavy cream
- 8 ounces white chocolate, finely chopped
Cookies:
- 3/4 cup granulated sugar
- 1 1/2 cups plus 3 Tb all-purpose flour
- 3/4 cup plus 1 Tb unsweetened cocoa powder
- 1/2 tsp baking soda
- 1 1/2 tsp kosher salt
- 15 Tb (7 1/2 ounces) unsalted butter, cut into 3/4-inch cubes, at room temperature
For the Filling:
In a small saucepan, bring the cream to a boil over medium heat. Remove the cream from the heat and add the white chocolate (making sure all of the chocolate is covered by the cream). Let stand for one minute then whisk to melt. It will take about 6 hours to let the filling to get to the right consistency.
For the Cookies:
Line two baking sheets with parchment paper or Silpats.
In the bowl of a stand mixer fitted with the paddle attachment, add all of the ingredients except for the butter and combine on low speed. With the mixer running, add the butter a few pieces at a time, until all of it has been added. The mixture will have a sandy texture at first and then will begin to form pebble-size pieces. As soon as the dough starts to come together, stop the mixer.
Transfer the dough to a board and use the heel of your hand to shape the dough into a block about 5 by 7 inches. Cut the block into 2 pieces.
One at a time, roll each block of dough between two pieces of lightly floured parchment paper until 1/8 inch thick. Use a 2-inch circular cookie cutter (I used a big pastry coupler). Place 1/2 inch apart on the prepared baking sheets.
Bake for 12 to 15 minutes, rotating the pan halfway through the baking. Remove from oven and put on a cooling rack leaving the cookies on the sheet for 2 to 5 minutes (the cookies will be too soft to remove initially). Then transfer to a cooling rack and let cool completely.
The dough trimmings can be pushed together once and rerolled to make more cookies (only re-roll twice).
To Assemble:
Place half of the cookies upside down on a work surface. Whip the filling lightly with a whisk just to aerate it a bit; it will lighten in color and fluff up. Do not overwhip, or the filling may begin to separate.
Transfer the filling to a pastry bag fitted with a 1/4-inch plain tip or use a disposable pastry bag and cut an opening at the tip of the bag. Pipe about 1 1/2 teaspoon of filling in the center of each cookie. Top with another cookie, right side up. Gently, using your fingertips, press the cookies together until the filling comes just to the edges.
The cookies can be stored in an airtight container for up to 3 days.
Note: for the leftover dough you have rolled twice, I just put it on the baking sheet and baked it. Then, had that for the family to munch on.
Pseudo, yet easy Chocolate Mousse

With spring’s early advent in the Northwest, one cannot escape the driving urge to buy fresh produce (preferably strawberries & rhubarb) to make a pie or crisp to welcome the May Day in March. However, as we’ve been fooled into thinking it’s time to pull out our swimsuits & sandals, we cannot escape the reality that it’s not the summer sun shining down quite yet. Hence making it impossible to eat that fresh strawberry-rhubarb pie.
During this Lenten season, our family is eating beans & rice Monday through Friday for dinner, trying to embrace simplicity in our everyday lives. It’s been a fruitful experience thus far. It’s also fun to read or hear about a number of individuals eating beans & rice for the whole month of March. As we’ve been partaking in simplicity for our weeknight dinners, it has made Sunday night dinners extra special. I made this last Sunday along with this Chocolate Mousse. I was wanting to make a chocolate cream pie, but it was around 4:00 and my ambitious, idealist nature waved the white flag to that simple, realistic side screaming at the top of its lungs.
Now this mousse seriously feeds a crowd (I put the rest in a tupperware and sent it to Ben’s work). It’s creamy, rich and has a chocolate ice cream sort of taste. If you’re a fan of these and you don’t have much time to make a dessert, I recommend this hand’s down. And if you’re standing in your kitchen in late Spring when fresh strawberries are available, but your palate is saying, “chocolatey richness!” Then, make this and top with sliced strawberries–perfectly divine.

Pseudo Chocolate Mousse (printable recipe)
Ingredients:
- 2 cups heavy cream, cold
- 12 ounces bittersweet chocolate, I used a bag of Ghiradelli 60% cacao chips
- 1 can sweetened condensed milk
Directions:
Chill an electric mixing bowl & the whisk attachment for about 10 minutes.
In a small pan, fill with about 1 cup of water and place a heatproof bowl on top. Make sure the water doesn’t touch the bowl. Heat over low heat, you want the water to simmer. Add the chocolate chips or chopped chocolate to the bowl, stirring occasionally until melted. Once melted, remove bowl from pan and let come to room temperature.
Remove the electric mixing bowl and whisk attachment and attach to the mixer. Pour in the cold whipping cream and turn your mixer on high speed (10 on Kitchenaid). Beat until stiff peaks appear, because you’re using the whipped cream as your base for the mousse (about 1 1/2 to 2 minutes). When you raise your beater, the whipped cream should be able to stand up well on it’s own.
Add the can of sweetened condensed milk to the cooled, melted chocolate. Stir until thoroughly combined (no streaks remain). Fold in the whipped cream until no visible streaks remain from the whipped cream. Cover the bowl with plastic wrap or foil. Refrigerate for an hour (if you can wait that long). The longer it sits in the fridge, the more congealed it will get, which is a good thing.
Chocolate Chip Cookie Olympics

I remember sitting on my parents bed watching the opening ceremony of the 1992 Olympics in Barcelona, Spain. I was eager in anticipation to watch the Women’s (really girls) gymnastic team. I would study their moves, watch with my jaw dropping at Dominque Dawes floor performance and wonder why my mom didn’t enlist me on my path toward gold medaldom (copyright Kamille) at age 2. However, once it hit the Atlanta Olympics, where the US Women clinched the gold title with Kerri Strug’s renowned performance on the vault, my interest in the Olympics had hit a standstill. Not only have they hit a standstill, but a divorce of the relationship. As I sat around a table of friends discussing how they couldn’t get enough of the Winter Olympics in Vancouver and how they’re a bit sleep deprived as a result, I hated to respond, because I was afraid of the obvious scorn. I piped in a bit sheepishly, “Yeah, well, I haven’t watched one ounce of Olympic coverage this year.” Looks were given. Them trying to be courteous without telling me of my ignorance.
So there you have it. I’m not an Olympic watcher. It honestly doesn’t interest me that much anymore. I understand why people get all excited about it (the various cultures & people represented, the nostalgia, etc, etc); but, really, it’s something I’m not crazy about. Instead, I have spent the past two days preparing for what I call the Chocolate Chip Cookie Olympics. Now this is something I get excited about. A chocolate chip cookie can bring people together or tear them apart. You understand. You walk into a coffee shop and they have those big chocolate chip cookies in the big glass container and you pause. You really want to eat one, but you wonder if they meet the criteria. You could possibly end up hashing out $1.50 – 2.00 on a waste of your daily caloric intake. I would wager to say that there is nothing quite as disappointing as biting into what looks like the promise land flowing of chocolate chips & butter to find a C.C.C. disguised as a dry sand-like substance floating around your mouth. We’ve all been there. So I set out to make three different chocolate chip cookie recipes, where I would present them to my tasters and they would judge & award gold, silver, & bronze.
 Superlative Chocolate Chip Cookies (Cooks Illustrated)
I first made these Superlative Chocolate Chip Cookies from Cooks Illustrated in late summer (click on the above picture and it will take you there). These cookies probably have one of the most superb flavor profiles you’ll find. I chose this recipe, because it is my favorite chocolate chip recipe. The recipe calls for chocolate chips & toasted pecans. There are chocolate chip recipes masquerading as “chocolate chip cookies,” but they’re not true to the definition. The ones that include oats, dried fruit, nut butters, coconut, etc. They’re good for sure, but for the sake of all things being equal. I was on the search of a true chocolate chip cookie, no strings attached. So for this round, I took out the toasted pecans to make it equal among the other two candidates.
The other two contestants were the classic N.Y. Times chocolate chip cookie & a recipe claimed as the best chocolate chip cookie from ‘Not Without Salt‘ blog. A word why these two were chosen. My friend Paige loves to bake equally as much and I would say enjoys food more than I do (that’s a compliment by the way). She has mentioned that these are her family’s chocolate chip cookie of choice. After I posted on the Superlative C.C.C., she commented that her & her husband Stephen still found their aged cookie to be better. I still never made them. Then, a couple days ago, a friend Julie emailed me about the best cookies she ever tasted with sea salt on top. Guess which cookie she was talking about? Yup! N.Y. Times C.C.C. So they were enlisted immediately. And the last cookie was enlisted because Ashley Rodriguez of Not Without Salt was the former Pastry Chef of Ciao Thyme in Bellingham. I trusted the head chef Matio Gillis’ opinion of Ashley, so when she said her’s were the best, I thought, “heck, I need to try them.” And so goes the C.C.C. Olympics.
I made each of the cookies warm to order, so all of the tasters ate them warm. I however, didn’t make them equal in using the same type of chocolate for each, which caused a bit of discrepancy in the final tasting (but I did take that into account for the final tallying). I will go through each cookie stating the Pros & Cons.
 Cooks Illustrated Cookie
Pros: Tasters said these had the best flavor of the three. They noted, “buttery, salty, caramel & toffee, nutty…tastes like a blondie in cookie form…chewy, with crisp edges.” These cookies don’t need to sit in the fridge for 24 to 36 hours to get those flavors, like the N.Y. Times cookie. They don’t require a mixer, just a whisk.
Cons: Texture didn’t win as big on these. Although they were chewy, they lacked the combination of soft, chewy that one taster found she liked in the “Subway Chocolate Chip Cookie.” Upon sitting at room temperature, these cookies tend to dry out a bit faster. One taster said that he didn’t care for the chocolate in these cookies, compared to the N.Y.Times one. However, I did use different chocolate chips in both, so had I used the same kind, the outcome could have been different. Doesn’t make as many cookies as the other recipes.
Technique: The caramel, toffee, nutty taste comes from melting the butter and toasting it; rather, than the typical creaming method. By melting the butter, you’re taking out some of the liquid found in the solidified butter and lends to a chewier cookie. Also, by using one egg & one egg yolk, you create more chew and take away the protein found in the extra white, which cuts back the dryness factor. I chilled this dough for 12 hours in the fridge and measured all the ingredients; as well as, measuring each cookie to 3 1/2 ounces to bake.
 NY Times Cookie
Pros: The tasters were unanimous about loving the texture on this cookie. As one taster mentioned sheepishly, “It tastes like, don’t judge me, but like the Subway cookies, a bit of chew, softness, chocolate chunk, and melds together well.” Another taster said, “as a chocolate chip cookie purist, this one wins for me. This is what I think of when you say Chocolate Chip Cookie.” For me, I did two tastings. One at 36 hours of aging the dough and another at 41 hours, and I would say that this cookie tasted better the second time. The first tasting I didn’t taste strong notes of toffee, caramel, or butterscotch like the article said it would have at 36 hours. However, I did taste it at the 41 hour mark. They still have softness after sitting on the counter (wrapped up) 24 hours later.
Cons: They take 36 hours in the fridge before they’re ready. And if you want more depth of flavor, leave them in there up to 72 hours (reminded me of how long a baby can stay in the womb once the mama’s water breaks–weird, huh?). The flavor wasn’t as stand out as the Cooks Illustrated.
Technique: What makes these cookies stand out is letting them sit in the fridge for up to 36 hours before baking them. And you sprinkle sea salt on top to let the flavors pop. By letting the dough age, you’re allowing the proteins in the flour meld with the butter, sugar & salt to create a broader flavor profile. You also use two different flours (cake flour & bread flour), which create a wonderful marriage in the chemistry arena of the baking process. Cake flour with low proteins doesn’t suck up liquid like bread flour; rather, cake flour’s low protein creates a softer, paler end product along with the protein creating steam with the liquids. Bread flour with it’s higher protein browns faster and sucks up the liquid. So if you only used cake flour, you would have a cakey cookie, lacking any chewiness or a bit of a crust. However, if you only used bread flour, you would end up with a very brown, crisp cookie. Hence the perfect marriage. I also used 60% & 70% cacao, along with some milk chocolate chunks in this dough.
 Not Without Salt Cookie
Pros: This was the least loved. Tasters said it was fine, and a nice fall back option. The dough was a bit above average (C+). The sprinkling of sea salt added that pop flavor. I could note a bit uniqueness in the crust, which might be attributed to the use of Turbinado sugar. I had a bit of caramel tones.
Cons: Too much chocolate (the recipe called for quite a bit), lacked anything special about it. It was okay, but not the best.
Technique: I went ahead and let this one sit in the fridge for 36 hours too, but it never aged as well as the N.Y. Times cookie. If I were to make these again, I wouldn’t use as much chocolate as the recipe called for, because it ended up feeling like you were eating chocolate with some cookie, not the other way around. Sprinkling Fleur de Sal on top before baking lends something extraordinary to even the most ordinary chocolate chip doughs.
Results: The tasters were not unanimous in their decisions. One said her favorite was the Cooks Illustrated. Three other tasters said the N.Y. Times one was their favorite. And as one taster said, “Although the flavor of the C.I. cookie is superior to the N.Y. Times one, the N.Y. Times has great texture and slightly inferior flavor, but makes it a better cookie since it meets both standards–regardless if the flavor isn’t as superior.”
So if you have time on your hand (41 hours to 72 hours), make the N.Y. Times cookies. However, if you want warm cookies right now, make the Cooks Illustrated. The comparison between the two reminds me of Michael Phelp’s Miracle finish. So you be the judge and make both–let me know what you think.
Overall Scores:
Gold to N.Y. Times
Silver to Cooks Illustrated
Bronze to Not Without Salt
Update (2/28/2010): I did not use the feves talked about in the N.Y. Times recipe. Instead, I bought a pound of chocolate from Trader Joe’s (70%) and cut it into smaller chunks with a serrated knife. I did the same with some milk chocolate I have in bulk. You could use packaged chocolate chunks as well. I feel like the chocolate chip texture doesn’t hit the spot as well as chunk form.
